Contacts
Contacts are crucial for creating shipments within our system. Once verified, these contacts can become parties associated with specific shipments. In this section, we'll guide you through the process of creating and managing them.
Creating a Contact
To create a contact:
- Access the 'Contacts' tab on the left side of your user interface.
- Choose 'Create New Contact' to start the contact creation process.
- Edit the contact details as needed, ensuring all necessary fields are accurately filled.
Here is an example of a properly filled contact to serve as a reference:
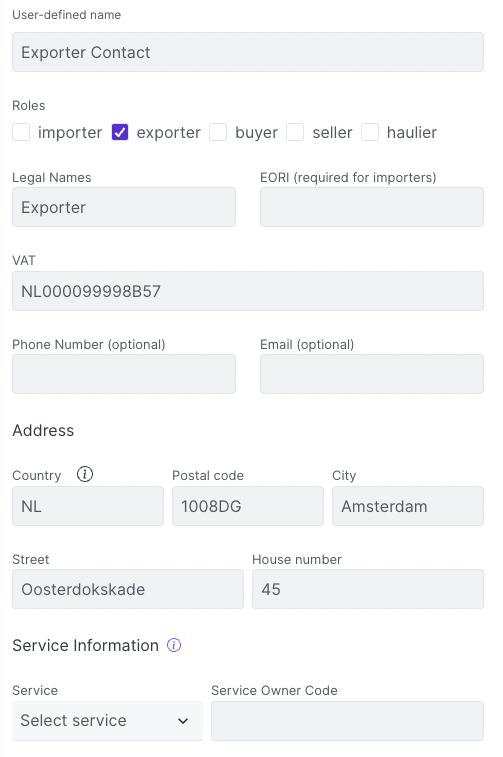
You can adjust the content as necessary and add the actual example contact details and a practical reference for your users.
Once administrators have verified a contact, it becomes readily available for use in your API requests.
Duplicating a Contact
From the 'Contacts' section, you can also duplicate a contact for ease of use or to create similar entries. To duplicate a contact, locate the contact you want to duplicate, then click the 'Duplicate' button.
Deleting a Contact
If you need to remove a contact for any reason, it's a straightforward process. Locate the contact you want to delete, then click the 'Delete' button. Please exercise caution when deleting contacts, as this action is irreversible.
Creating a Contact through the API
You can also create a contact with the API. Shipments refer to a contact by its code, so the code has to be unique within your organization. If a contact with the same code already exists, a status code 409 (Conflict) is returned.
The code and at least one role in roles are required. The supported roles are importer, exporter, consignee, consignor, buyer, seller and haulier. The other fields are optional. On success a status code 201 (Created) is returned together with the created contact.
You can create a contact for a client organization by adding its domain in the onBehalf field. This is only possible for Intermediary organizations and for service providers that have a relation with the client. Otherwise a status code 401 (Unauthorized) is returned.
Here is an example API request for creating a contact:
POST https://api.quayconnect.io/v2/shipments/contacts
Headers:
Authorization: Bearer your-access-token
Content-Type: application/json
Body:
{
  "code": "Acme",
  "legalName": "Acme BV",
  "roles": ["consignee", "importer"],
  "address": {
    "street": "Erasmusbrug",
    "houseNumber": "1",
    "postalCode": "3011AA",
    "city": "Rotterdam",
    "country": "NL"
  }
}
Retrieving a Paginated List of Contacts
If you want to get a paginated list of your contacts, you can use the following endpoint. This endpoint allows you to specify the customer organization, page size, and page number. The default values for page size and page number are 25 and 1, respectively. Contacts are ordered by the date of creation in descending order (most recent first).
If you are an Intermediary organization, you can request to see the list of contacts of your clients by entering their organization domain.
Contacts of clients can only be accessed by Intermediary organizations. If a non-Intermediary organization attempts to access the contacts of another organization, a status code 401 (Unauthorized) will be returned.
Here is an example API request for retrieving contacts for my organization with a page size of 25 and the first page:
GET https://api.quayconnect.io/v2/shipments/contacts
Headers:
Authorization: Bearer your-access-token